
Creating Check Box in Angular 8
A checkbox bears a great deal of significance, as you are already aware if you have been developing applications of any kind up to this point. It not only simplifies the process of entering data into any platformbut also makes it possible to sort data quickly because the list feature is frequently included. In this tutorial, we’ll go over the steps of creating a checkbox in Angular 8 in the given order. Learn comprehensively to create a checkbox in Angular 8 with practical implementation in our Angular Training in Chennai at Softlogic Systems.
Create a checkbox in Angular 8
Let’s use an example where we have a list of orders to choose from and we must present this to the user in the form of a checkbox in order to demonstrate how to create a checkbox in Angular8. To accomplish this, adhere to the code below.
constordersData = [
{ id: 1, name: ‘order 1’},
{ id: 2, name: ‘order 2’},
{ id: 3, name: ‘order 3’}
{ id: 4, name: ‘order 4’}
];
Since the data was already with us in this instance, we used the code that was previously discussed. This information would most likely be imported through an API in the real world. Check out this complete stack development course right away to learn more.
Reactive forms can be used in this instance as well to provide a cleaner, more effective output. Look at the sample below to get an idea of how to achieve this.
import { Component } from ‘@angular/core’;
import { FormBuilder, FormGroup } from ‘@angular/forms’;
@Component({
selector: ‘my-app’,
templateUrl: ‘./app.component.html’,
styleUrls: [‘./app.component.css’]
})
export class AppComponent {
form: FormGroup;
ordersData = [];
constructor(private formBuilder: FormBuilder) {
this.form = this.formBuilder.group({
orders: []
});
}
submit() { … }
}
We have used the following in the code above.
- Form Groups: A single form is represented by FormGroups.
- FormControl: a form control that symbolizes a solitary entry.
- FormArray: used to display an assortment of all FormControls.
The form created in the aforementioned example using the FormBuilder service will resemble the one below.
<form [formGroup]=”form” (ngSubmit)=”submit()”><!– our form array of checkboxes will go here –>
<button>submit</button>
</form>
By using [formGroup]=”form” in the example above, we have connected the form with the form element.
After creating the foundational form, let’s add some dynamic functionality using the FormArray as demonstrated below.
import { Component } from ‘@angular/core’;
import { FormBuilder, FormGroup, FormArray, FormControl, ValidatorFn } from ‘@angular/forms’;
@Component({
selector: ‘my-app’,
templateUrl: ‘./app.component.html’,
styleUrls: [‘./app.component.css’]
})
export class AppComponent {
form: FormGroup;
ordersData = [
{ id: 100, name: ‘order 1’ },
{ id: 200, name: ‘order 2’ },
{ id: 300, name: ‘order 3’ },
{ id: 400, name: ‘order 4’ }
]
;
constructor(private formBuilder: FormBuilder) {
this.form = this.formBuilder.group({
orders: new FormArray([])
});
this.addCheckboxes();
}
private addCheckboxes() {
this.ordersData.forEach((o, i) => {
const control = new FormControl(i === 0);
(this.form.controls.orders as FormArray).push(control);
});
}
submit() {
constselectedOrderIds = this.form.value.orders
.map((v, i) => v ? this.orders[i].id : null)
.
filter(v => v !== null);
console.log(selectedOrderIds);
}
}
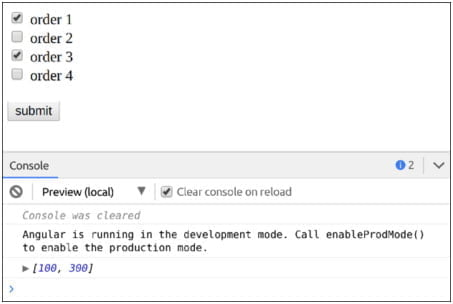
In the example above, we established a new FormControl and took our orders from a FormArray after each iteration of the loop. Since the first control has been set to true, the first order is automatically selected from the list.The exact order information that must be displayed to the user must then be obtained by binding the FormArray element to this template.
<form [formGroup]=”form” (ngSubmit)=”submit()”>
<label formArrayName=”orders” *ngFor=”let order of form.controls.orders.controls; let i = index”>
<input type=”checkbox” [formControlName]=”i”>
{{ordersData[i].name}}
</label>
<button>submit</button>
</form>
Output
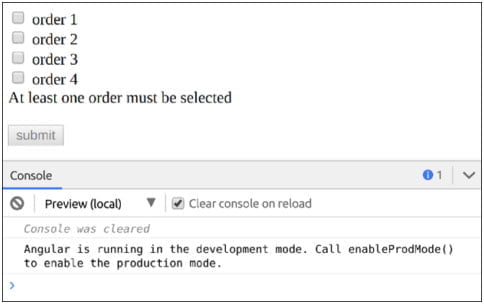
Validating the checkbox in Angular 8
The example below demonstrates how to validate a checkbox:
<form [formGroup]=”form” (ngSubmit)=”submit()”>
<label formArrayName=”orders” *ngFor=”let order of form.controls.orders.controls; let i = index”>
<input type=”checkbox” [formControlName]=”i”>
{{ordersData[i].name}}
</label>
<div *ngIf=”!form.valid”>At least one order must be selected</div>
<button>submit</button>
</form>
…
export class AppComponent {
form: FormGroup;
ordersData = […];
constructor(private formBuilder: FormBuilder) {
this.form = this.formBuilder.group({
orders: new FormArray([], minSelectedCheckboxes(1))
});
this.addCheckboxes();
}
…
}
function minSelectedCheckboxes(min = 1) {
const validator: ValidatorFn = (formArray: FormArray) => {
consttotalSelected = formArray.controls
.map(control =>control.value)
.reduce((prev, next) => next ? prev + next : prev, 0);
return totalSelected>= min ? null : { required: true };
};
return validator;
}
Output
Adding Async form controls
We’ll discover how to add ASync to these forms now that you know how to add dynamic checkboxes.
import { Component } from ‘@angular/core’;
import { FormBuilder, FormGroup, FormArray, FormControl, ValidatorFn } from ‘@angular/forms’;
import { of } from ‘rxjs’;
@Component({
selector: ‘my-app’,
templateUrl: ‘./app.component.html’,
styleUrls: [‘./app.component.css’]
})
export class AppComponent {
form: FormGroup;
ordersData = [];
constructor(private formBuilder: FormBuilder) {
this.form = this.formBuilder.group({
orders: new FormArray([], minSelectedCheckboxes(1))
});
this.ordersData = this.getOrders();
this.addCheckboxes();
}
private addCheckboxes() {
this.ordersData.forEach((o, i) => {
const control = new FormControl(i === 0);
(this.form.controls.orders as FormArray).push(control);
});
}
getOrders() {
return [
{ id: 100, name: ‘order 1’ },
{ id: 200, name: ‘order 2’ },
{ id: 300, name: ‘order 3’ },
{ id: 400, name: ‘order 4’ }
];
}
submit() {
constselectedOrderIds = this.form.value.orders
.map((v, i) => v ? this.ordersData[i].id : null)
.filter(v => v !== null);
console.log(selectedOrderIds);
}
}
…
import { of } from ‘rxjs’;
…
constructor(private formBuilder: FormBuilder) {
this.form = this.formBuilder.group({
orders: new FormArray([], minSelectedCheckboxes(1))
});
of(this.getOrders()).subscribe(orders => {
this.ordersData = orders;
this.addCheckboxes();
});
}
Conclusion
The popular JavaScript framework Angular is used to develop client-side web apps that are scalable, business-oriented, and performant. Due to the widespread use of the Angular framework, better job prospects are indirectly created by the community-driven performance management of the application.
All of these fresh ideas surrounding enterprise application development are covered in the Angular Certification Training.Accelerate your web development skills by learning in our Angular 8 Training in Chennai at Softlogic Systems.