
Angular 8 Tutorial for Beginners
The Angular community has published Angular 8, the most recent version. It won’t be tough for you if you are familiar with earlier versions of Angular. The transition to version 8 of the Angular CLI is simple. Learn the Best Angular Training in Chennai at Softlogic to explore its features through practical implementations on real-time projects.
What is Angular 8?
A framework for building client-side, TypeScript-based dynamic web apps is termed Angular 8. With a few notable exceptions, it is remarkably identical to earlier versions.
- Time-to-time
- Location-to-location
- User-to-user
New Features in Angular 8
The much-anticipated Ivy compiler was included as an opt-in feature in the most recent version of Angular, version 8, which was published by the Angular community. These are Angular 8’s standout characteristics:
- TypeScript 3.4 is supported by Angular 8.
- Web Workers are supported by Angular 8
- Ivy Rendering Engine is Angular 8’s new compiler.
- Dynamic imports for lazy-loaded modules are available in Angular 8.
- An enhancement to ngUpgrade
TypeScript 3.4
Executing your Angular 8 project requires TypeScript 3.4, which Angular 8 supports. Therefore, you must update to TypeScript version 3.4.
Web workers class
Since JavaScript only has one thread, asynchronous execution of more important operations like data calls is typical. By allowing you to conduct CPU-intensive operations in the background thread, Web Workers enable you to free up the main thread for UI updates. If your application is unresponsive while processing data, web workers may also be of assistance. Using the Angular CLI, we must first establish the web worker before outsourcing such a calculation to the background.
ng generate workers n-queens
Facts about Ivy and Bazel
The new build system is Bazel, and Ivy is the new rendering engine. With Angular 8, both are prepared for appropriate use. These two should soon have a preview accessible. Ivy is a new Angular compiler and runtime, and Angular 8 is the first version to provide a switch to formally opt-in to Ivy.
In Angular version 9, Ivy is planned to be the default rendering engine. One of Angular 8’s newest capabilities is made available via Bazel as a way to speed up the development of your CLI application.
The primary features of Bazel are:
- The tests and incremental build.
- It gives you the opportunity to create your backends and frontends using the same tool.
- It has the potential to have a cache on the build farm and remote builds.
Dynamic Imports for Modules with Lazy Loading
For lazy-loaded modules, Angular 8 enables you to utilize normal dynamic import syntax rather than a bespoke string.
It refers to lazy-loaded import that appeared as follows:
{ path: ‘/student’, loadChildren: ‘./student/student.module#StudentModule’ }
It can be as follows
{path: `/student`, loadChildren: () => import(`./student/student.module`).then(s =>s.StudentModule) }
Angular CLI Workflow Improvements
The Angular CLI is always getting better. Now, third-party libraries and tools are included with the ng build, ng test, and ng run. For instance, AngularFire already employs a deploy command to take advantage of these new features.
Prerequisite for the tutorial for Angular 8
Versions greater than 10 of Node.js must be installed. NPM will also be upgraded because it will be the standard. We are using Node 12.4.0 for this.
MongoDB must be set up on your computer. With Softlogic Systems‘ Angular Course in Chennai, you can learn how to install and setup Angular 8.
Angular 8 Tutorial
Here, we’ll develop two distinct projects :
Using Angular for the front end and Node.js, Express, and MongoDB for the back end, respectively. Additionally, a backend API will be developed and used by the frontend.
Check out the following technologies that have been installed in your system
- Node: 12.4.0
- Angular CLI: 8.0.2
- NPM: v12.4.0
- MongoDB shell version v4.0.10
- MongoDB version v4.0.10
- Windows 10
Use the ng —version command to determine the versions of Node and Angular CLI.
Use the node -v command to see the version of npm.
Use the mongoDB —version command to determine MongoDB’s version.
Use the mongo —version command to determine the MongoDB shell version.
CLI commands
An initialization, development, scaffolding, and maintenance tool for Angular applications is called Angular CLI. Using an interactive UI, like the Angular Console, or directly from a command prompt, you may execute these instructions.
| Command | Alias | Description |
| Add | It is utilized to assist your project’s utilization of external libraries. | |
| Build | b | It creates a directory at the chosen output path where an Angular application is compiled. Run the command from a directory within a workspace. |
| Config | The workspace’s angular.json file contains Angular configuration information that may be accessed or changed. | |
| Doc | d | It uses a browser to search for a certain term in the official Angular documentation (angular.io). |
| e2e | e | It creates and serves an Angular application before doing end-to-end testing using Protractor. |
| generate | g | A schematic is used to create and/or alter files. |
| Help | It lists all available commands and gives a succinct explanation of each. | |
| Lint | l | It is utilized to execute linting tools on the Angular app code in a particular project folder. |
| new | n | It starts from scratch and creates a new workspace and Angular app. |
| run | When you define a certain builder configuration in your project, it executes an Architect target with that configuration. | |
| serve | s | When files are changed, it rebuilds and serves your application. |
| test | t | In a project, it executes unit tests. |
| update | Your program and its dependencies are updated. View it at https://update.angular.io | |
| version | v | The Angular CLI version is provided. |
| xi18n | I18n messages are extracted from the source code. |
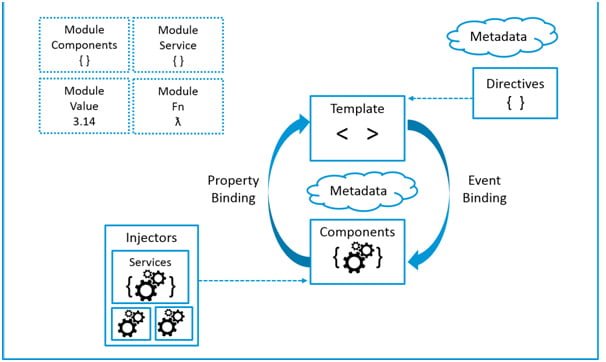
Building Blocks of Angular 8
Angular’s fundamental building blocks are:
- Modules
- Components
- Templates
- Metadata
- Data binding
- Directives
- Services
- Dependency injection
Angular Libraries
With Angular, we have access to a number of JavaScript modules (library modules) that offer different functionality. Like @angular/core, @angular/compiler, @angular/compiler-cli, @angular/http, and @angular/router, each Angular library has a @angular prefix. The npm package manager may be used to install them, and JavaScript import statements can be used to import specific sections of them.
import { Component } from ‘@angular/core’;
Components
A view is a part of the screen that is controlled by a component. Components like App Component (the bootstrapped component), Course Component, Course Detail Component, etc. can be used, for instance, while creating a course list application.
A component’s application logic, or how it supports the view, is defined inside the component as a class. Through a set of attributes and methods on the API, the class communicates with the view.Every app has a primary component called AppComponent that is bootstrapped inside the main module.
import { Component } from ‘@angular/core’;
@Component({ selector: ‘app-root’,
templateUrl: ‘./app.component.html’,
styleUrls: [‘./app.component.css’]
})
export class AppComponent {
title = ‘Softlogic’;>
}
Let’s add one more component as follows
import { Component, OnInit } from ‘@angular/core’;
import { Course } from ‘../courses’;
import { CoursesService } from ‘../courses.service’;
@Component({
selector: ‘app-course’,
templateUrl: ‘./course.component.html’,
styleUrls: [‘./course.component.css’]
})
export class CourseComponent implements OnInit {
courses: Course[];
constructor(private courseService: CoursesService) { }
ngOnInit() {
this.getCourses();
}
getCourses(): void {
this.courseService.getCourses().subscribe(course =>this.courses = course);
}
}
Templates
The component’s view is connected to its coordinating template. Simply said, a template is a set of HTML elements that instructs Angular on how to render a component. A template resembles standard HTML with a few minor exceptions. As we mentioned previously, the following is a template for our CourseComponent:
All Courses
<ul class=”course”>
<li *ngFor=”let course of courses”>
<a routerLink=”/detail/{{course.id}}”></a>
<span class=”badge”>{{course.id}}</span> {{course.name}}
</ul>
Metadata
To parse a class, metadata instructs Angular. Metadata is added to the class in order to inform Angular that the component is called Course Component. You attach the information in TypeScript by using a decorator. You can see the metadata associated with the course component in the code below:
@Component({selector: ‘app-course’,
templateUrl: ‘./course.component.html’,
styleUrls: [‘./course.component.css’]
})
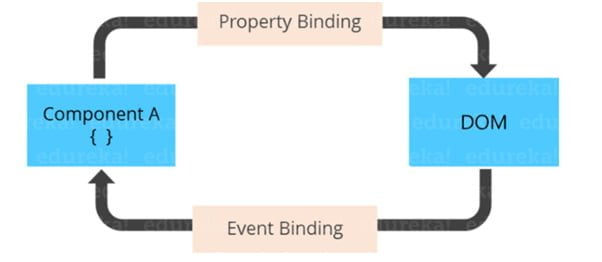
Data Binding
If a framework is not being used, it is necessary to push data values into HTML controls and translate user input into actions and value changes. Such push/pull reasoning is laborious, prone to errors, and difficult to read. Data binding, a method for coordinating elements of a template with elements of a component, is supported by Angular. To instruct Angular on how to link the two sides, you should add binding markup to the template HTML.
- {{course.name}}
- (click)=”selectCourse(Course)”>
- The component’s name property value is shown in the li> element using the course.name interpolation.
- The [course] property binding transfers the value of the selectedCourse property from the parent CourseComponent to the child CourseDetailComponent’s course property.
- When a user clicks a course name, the(click) event binding invokes the component’s selectCourse function.
Two-way Data Binding
The ngModel directive is used in two-way data binding, which unifies property and event binding into a single syntax. Here is an illustration from the template for the CourseDetailComponent:
<input [(ngModel)]=”courses.name” placeholder=”name”/>
Similar to property binding, two-way binding involves a data property value flowing from the component to the input box. Similar to event binding, the user’s modifications also flow back to the component, restoring the property to its most recent value. Each JavaScript event cycle, starting at the root of the application component tree and working down through all child components, causes Angular to process every data binding.
Communication between a template and its component is greatly aided by data binding. For communication between parent and child components, data binding is also crucial.
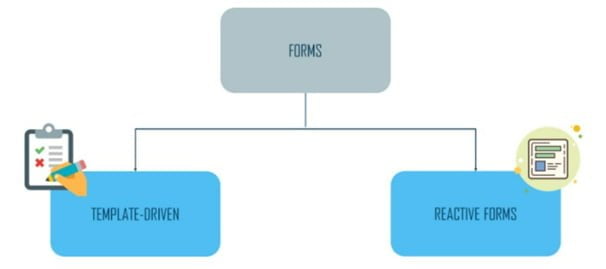
Validating Forms with Angular Forms
One of the most common elements of every online application is the ability to provide a form for users to fill out. You use forms every day to log in, register, place orders, and so on. Processing user inputs without first verifying them is risky. Angular provides robust capabilities for verifying user inputs and displaying validation messages as a comprehensive framework.
You may either create your own unique validators or utilize the built-in validators that are already there. An Angular form is a standard HTML form with a few additional functionalities.
We’ll cover this in more detail in the following session. In each form, there is something known as a FormControl, which is essentially an object that is necessary for each field (input, radio, select, etc.) in the form.
Additionally, forms make use of synchronous data flow between the data model and the view, and they also provide direct access to the underlying form. API will make it much simpler to create large-scale shapes.
Taking a closer look at it:
In Angular, there are reactive and template-driven methods for processing user input from forms. Both gather events related to user input from the view, analyze the data, update the form model and data model, and record changes.
The processing and management of form data differ between reactive and template-driven forms. Each strategy has unique benefits.
Reactive forms: Reactive forms offer direct, explicit access to the underlying forms object model. They are more scalable, reusable, and tested than template-driven forms, making them more reliable. If you’re using reactive patterns to design your project or if forms are a key component of it, use reactive forms.
Template-driven forms: Using directives in the template, they build and modify the underlying object model. They help in adding a straightforward form to an app, such as email list signup form. Even while they are easy to incorporate into a program, they are not as scalable as reactive forms. If you have very minimal form requirements and logic that can be handled entirely in the template, template-driven forms could be effective.
Let’s examine their main differences:
| Keys | Reactive | Template-Driven |
| Form Model Setup | Created in component class and it is explicit | Created by directives and it is implicit |
| Data Model | Immutable and structured | Mutable and unstructured |
| Data Flow | Synchronous | Asynchronous |
| Form Validation | Functions | Directives |
Validation in Template-Driven Forms
To validate common use cases, Angular comes with built-in validators. You must add validation attributes to each form field that needs to be verified in order to use built-in validators.
The minlength, maxlength, and other required HTML5 validation properties are the same as these attributes. In order to match these properties to the validator methods mentioned in the Angular framework, Angular has provided directives.
Every time Angular does validation and the value of a FormControl changes, a list of validation failures is produced. The status is valid if the list is empty; otherwise, it is invalid. For each form control where we wish to apply validation, we must add the appropriate validation attributes to each FormControl and export ngModel to a local template variable.
The following example exports ngModel to the name variable:
<span style=”font-weight: 400;”></span><span style=”font-weight: 400;”>ngModel</span><span style=”font-weight: 400;”>name</span><span style=”font-weight: 400;”>=</span><span style=”font-weight: 400;”>”name”</span><span style=”font-weight: 400;”>#name</span><span style=”font-weight: 400;”>=</span><span style=”font-weight: 400;”>”ngModel”</span><span style=”font-weight: 400;”>></span>
- The aforementioned example made use of the built-in validators required, minlength, and maxlength.
- The HTML validation attributes required and minlength are present in the input> element.
We may utilize the template variable name in the template to verify the validity statuses of the used validators:
Name is required.
div>
Name cannot be more than 15 characters long.
div>
Name must be at least 2 characters long.
div>
div>
Reactive Forms Validation
The source of truth in a reactive form is the component class. You may add validator methods directly to the form control model in the component class rather from utilizing attributes in the template to do so. Angular executes these routines whenever the value of the control changes.
Reactive Forms provide Validator Functions to do out validation.
Validator functions can be used in synchronous or asynchronous fashion.
Synchronous routines known as “sync validators” accept a control instance and immediately return a list of validation failures or null. You can enter these as the second argument when instantiating a FormControl.
Async validators are asynchronous methods that accept a control object and return a Promise, an Observable, or null after a certain amount of time and a sequence of validation failures. You can enter these as the third argument when instantiating a FormControl.
The FormControl class’s signature is as follows.
<span style=”font-weight: 400;”> classFormControl extends AbstractControl {</span>
<span style=”font-weight: 400;”>constructor(formState: any = null, validatorOrOpts?: ValidatorFn | AbstractControlOptions | </span>
<span style=”font-weight: 400;”>ValidatorFn[], asyncValidator?: AsyncValidatorFn | AsyncValidatorFn[])</span>
<span style=”font-weight: 400;”> }</span>
To activate the built-in validator features, we may provide the appropriate ValidatorFn to a FormControl. For the following example, we’ve used the following built-in validators: minimum and maximum lengths are necessary.

Additionally, we don’t use the validation attributes, in contrast to template-driven forms. The ValidatorFn functions Validators.required, Validators.minLength(2), and others are utilized. Your code editor could autocomplete every ValidatorFn when you input Validators and a dot.
Conclusion
In this article, we compared two different methods for handling user inputs: template-driven forms and reactive forms. We mastered the process of adding validation to both types of forms. Finally, in addition to the built-in validators, we developed our own validator function. As we can see, Angular offers top-notch form support in addition to some crucial internal capabilities for form validation. Not all of the Angular forms’ functionalities are covered in this session. Learn comprehensively in our Angular JS Training in Chennai at Softlogic Systems.