Introduction
Getting started with web development can be overwhelming: so many frameworks, confusing concepts, and how to figure out building a scalable application from scratch. ASP.NET MVC is here to change this. It provides a structured, modern way to build powerful web applications using the familiar C# and the Model-View-Controller (MVC) design pattern that makes it logical and maintainable to organize your code.
Want to learn about the basics of MVC and how to create an application? Here is the detailed MVC Course Syllabus, and begin learning now!
Why Students or Freshers Learn MVC?
ASP.NET MVC is a very good starting point for students and freshers because from day one, it inculcates good habits.
- Clean Code Architecture: The Model-View-Controller pattern enforces a Separation of Concerns that will make your code easier to organize, read, and maintain.
- High Employability: The framework is used by large enterprises extensively, hence the demand for proficient .NET/MVC developers will always exist in the job market.
- Strong Foundation for Testing: MVC is designed for Test-Driven Development (TDD), which is an important skill to learn in modern software engineering, and is a way of making your applications much stronger and less buggy.
- Full Control: Unlike previous frameworks, MVC provides full control to the developers over HTML, CSS, and JavaScript, which are needed to power modern, responsive, and SEO-friendly web applications.
- Scalability: The structured approach and clear separation enable applications to grow in complexity and size without becoming unmanageable, which acts as the key factor in the development of the industry.
Ready to nail your first tech interview? Get Your Free MVC Interview Questions and Answers Guide here!
Check your knowledge level with our smart Knowledge Assessment Tool
- Instant skill evaluation with accurate scoring
- Identify strengths and learning gaps easily
- Designed for students and working professionals
- Smart assessment to guide your career growth
Take Your Eligibility Report Instantly
Step-by-Step MVC Tutorial for Beginners
This tutorial covers how to setup your environment and build a simple “Hello MVC” application using ASP.NET MVC.
Step 1: Setting Up and Installing
To get started with ASP.NET MVC, you need the main developing tool: Visual Studio.
- Get Visual Studio: Go to the official Microsoft website and download the Visual Studio Community Edition. This edition is free for students, open-source contributors, and individuals.
- Install Workloads: In the process of installing Visual Studio, you need to select “ASP.NET and web development” workload. This ensures that all the required components, templates, and SDKs, such as the .NET Framework, will be installed for MVC development.
- Launch: Now, launch Visual Studio by double clicking on the Visual Studio icon.
Step 2: Creating Your First MVC Project
This will give us a fully structured MVC application using the built-in project template.
- Create a New Project: After opening up Visual Studio, click on “Create a new project.”
- Choose Template:
- Search and select the “ASP.NET Web Application (.NET Framework)” template. Note: Make sure that you choose the “.NET Framework” one for a classic ASP.NET MVC experience, or you may choose ASP.NET Core Web App (Model-View-Controller) for the Core modern experience.
- Click Next.
- Configure Your Project:
- Project Name: Type MyFirstMvcApp.
- Location: Select where you want to save your project.
- Click Create.
- Choose MVC Template:
- In the final dialog, select the MVC template.
- For this introductory tutorial, choose “No Authentication” or accept the default.
- Click Create.
It will now create, in Visual Studio, a fully functional, boilerplate ASP.NET MVC application with the correct folder structure.
The MVC Folder Structure
Following the Separation of Concerns principle, the project template creates the following specific and highly organized folder structure:
| Folder | Role in MVC | Purpose |
| Models | Model | Holds the C# classes that represent the data and business logic (e.g., a Product class or a User class). |
| Views | View | Contains the HTML, CSS, and Razor code (.cshtml files) responsible for rendering the User Interface (UI). |
| Controllers | Controller | Contains the C# classes that handle incoming user requests, interact with the Model, and decide which View to display. |
| App_Start | Configuration | Contains configuration files (e.g., RouteConfig.cs for URL routing). |
| Content | Assets | Stores static files like CSS stylesheets. |
| Scripts | Assets | Stores static files like JavaScript/jQuery files. |
Step 3: Understanding the MVC Pattern
The most important thing to know about ASP.NET MVC is how these three components all interact with one another. This is actually the most important concept!
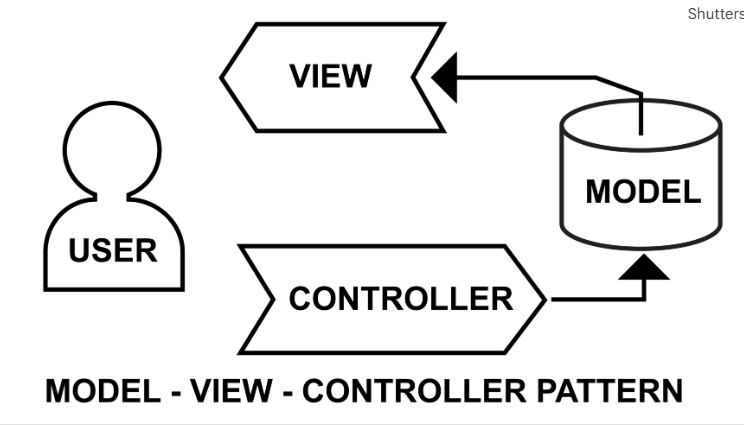
- Request by User: A user types a URL like /Home/Index in the browser.
- Routing: The ASP.NET Routing engine intercepts the URL and decides which Controller and Action Method should take care of the request. The default route is something like this {controller=Home}/{action=Index}/{id?}.
- Action Execution Controller: The routing engine locates the HomeController class and invokes the Index() method.
- Model Interaction Optional: The Controller’s action method can retrieve data from the database via the Model.
- View Choice: The Controller returns a View().
- Rendering: The View sends the final HTML response back to the browser.
Step 4: Building a Custom “Hello” Page
Now, let’s see how to extend the default structure in order to create our custom page and follow the MVC flow. We will create a Greeting Controller with a corresponding View.
4.1. Create a Controller
Logic to handle the request starts from the controller.
- Right click the Controllers folder in the Solution Explorer.
- Choose Add > Controller.
- In the left pane, select the “MVC 5 Controller – Empty” and then click Add.
- Name the Controller: Type GreetingController. The suffix Controller is required by convention.
- The GreetingController.cs file will be opened. Replace its content with the following C# code:
using System.Web.Mvc;
namespace MyFirstMvcApp.Controllers
{
public class GreetingController : Controller
{
// This is an Action Method. It handles the request: /Greeting/Welcome
public ActionResult Welcome()
{
// Use the ViewBag to pass temporary data from the Controller to the View
ViewBag.Message = “Hello from the Controller! You’re ready to build MVC apps.”;
ViewBag.Date = System.DateTime.Now.ToShortDateString();
// This tells the controller to look for a View named ‘Welcome.cshtml’
// inside the Views/Greeting/ folder.
return View();
}
}
}
4.2. Create a View
The View is the HTML/Razor file that shows the result to the user.
- Right-click inside the Welcome() action method in the GreetingController.cs file.
- Choose Add View.
- View Name: Should be Welcome, as it must match the name of the Action Method.
- Model: Leave Blank (no model).
- Check the box Use a layout page (the default \\_Layout.cshtml gives you a consistent header/footer).
- Click Add.
- Open the file Views/Greeting/Welcome.cshtml The file Views/Greeting/Welcome.cshtml will open. Replace its contents with this Razor/HTML code:
@{
// The C# code inside the @{} block is executed on the server.
ViewBag.Title = “Welcome Page”;
}
<h2>@ViewBag.Title</h2>
<p>
@* The @ sign renders the value of the variable passed from the Controller *@
<strong>Controller Message:</strong> @ViewBag.Message
</p>
<p>
<strong>Current Date:</strong> @ViewBag.Date
</p>
Step 5: Run Your Application
You now have your custom MVC page ready for action!
- Execute the Project: F5 or Green Play button in Visual Studio – Start Debugging
- Access Your Page: In your browser, the application’s default home page (/Home/Index) will pop up.
- Navigate to Your Custom Route: Open your browser and manually change the address to:, substituting in an actual port number that Visual Studio uses, for example, 54321.
You should see your custom title, the message and today’s date, passed from your GreetingController to your Welcome.cshtml View!
Once you get the basic flow working, aim your sights on these key next steps:
Model-View-Controller Communication
| Method | Lifespan | Use Case |
| ViewBag / ViewData | Current Request | Passing small amounts of temporary data from Controller to View. Requires casting for complex types. |
| @model | Current Request | Strongly-typed way to pass a complex C# Model object from Controller to View. (The preferred professional method) |
| TempData | Current Request + Next Request (on Redirect) | Passing status messages or data between two different Action Methods/Controllers during a redirect. |
Routing and URLs
- The URL format is usually in the following format: http://server/ControllerName/ActionName/Id.
- In the example, if you access /Greeting/Welcome, the router will find the GreetingController and perform the Welcome action method.
Razor Syntax
Razor (.cshtml) is a markup syntax that allows you to embed C# code in your HTML for dynamic content generation.
| Syntax | Description | Example |
| @ | Single expression (variable, property, or method call) | <h1>Hello @ViewBag.Name</h1> |
| @{} | Code block (for loops, logic, etc.) | @{ int x = 10; } |
| @model | Defines the type of Model the View expects | @model MyFirstMvcApp.Models.Product |
Knowing the general flow of M-V-C is one thing, but some of the most important implementation details, such as how to actually transfer data around, validation, and complex forms, can be a challenge for new developers to grasp.
Check out our ASP.NET MVC Online Course for Beginners! Master Model Binding, Data Annotations, and AJAX in MVC.
Real Time Examples for MVC Tutorial for Learners
ASP.NET MVC is an open-source versatile framework that has widely been used for building complex, scalable, and modern web applications in different sectors. Some real-time examples demonstrating the power and application of the framework are hereby mentioned.
E-commerce Platform (The Storefront)
- Model: Product, Order, and Customer Classes
- View: Product catalog page, shopping cart, checkout forms.
- Controller: Handles search product requests, adds items to cart, calculates taxes, and provides a payment gateway. This shows how MVC takes care of and treats very complex data interactions and user workflows with great aplomb.
Employment Marketplace or Job Portal
- Model: Classes for JobPosting, Applicant, and Recruiter.
- View: Job listing search results, the detailed job description page, and the application submission form.
- Controller: It controls the login/registration of users, filtering for job search processing, and file uploading for resumes. This highlights one of the strong points of MVC: managing user accounts and rich content.
Simple Social Media Dashboard: The Tracker
- Model: Post, Comment, UserProfile classes.
- View: The user feed, the creation form of a post, and the editing page of the profile.
- Controller: It handles the creation, updating, and deletion of posts (CRUD), and a controller fetches data from numerous models to display a complex feed. The example demonstrates that it is easy to realize modular, scalable, and secure CRUD by using MVC.
Ready to put it into practice? Download Your Absolutely Free List of MVC Project Ideas for Beginners!
FAQs About MVC Tutorial for Beginners
1. What are the fundamentals of ASP. NET MVC?
The base principle is the Model-View-Controller design pattern that implements Separation of Concerns. This means that the Controller knows only about requests, the Model is in charge of data and logic, and the View deals with the user interface.
2. Is ASP. NET MVC a programming language?
No, ASP.NET MVC is a framework and not a programming language. It is based on the .NET Framework and mainly the C# programming language (or VB.NET) is used in order to define controllers, models, and business logic.
3. Is the .NET framework MVC?
No. It’s huge and vast platform and environment that .NET Framework is. And within it lives ASP.NET MVC, which is one of the many technologies and frameworks for building web applications.
4. What is the 3 layer architecture of MVC?
The three layers are: Presentation Layer (View): Displays the UI. Business Layer (Model): holds application logic and manipulates data. Data Access Layer (Model/Repository): This handles the communication with the database.
5. Is MVC for frontend or backend?
MVC acts as a vital bridge between the two. The Controller and Model form the backend, dealing with the logic and data, while the View is primarily a frontend component, which generates the UI HTML/CSS/JS.
6. What are MVC skills?
Key skills required include: proficiency in C# (intermediate to advanced level), experience with the Model-View-Controller architecture, understanding of Razor syntax for the views, knowledge of HTML, CSS, and JavaScript, and the use of Entity Framework when interacting with databases.
7. Is .NET good for beginners?
Yes. The .NET platform is perfect for a beginner, containing a clear structure, great documentation, an incredible IDE (Visual Studio), and strong community support.
8. What is MVC in C++?
The MVC pattern as such is language-independent. In C++, MVC is applied to organize desktop or application programs-which include frameworks like Qt-by cleanly separating the UI from the underlying business logic and data.
9. How many types of MVCs are there?
Generally, there have been three main variants derived from MVC: Model2 (MVC for Web), MVP (Model-View-Presenter), and MVVM (Model-View-ViewModel). ASP.NET uses the Model2 approach.
10. What is a real life example of MVC?
This can be illustrated more clearly with the simple, well-known real-life example of an Online Banking Application. The request to view a balance is managed by the Controller, which retrieves the account data from the database through the Model, and it is the View that shows the formatted balance to the user.
Conclusion
You’ve effectively demystified the Model-View-Controller pattern, set up your development environment, and built your first ASP.NET MVC application. You now understand the vital role of Separation of Concerns in creating clean, maintainable, and professional code. This is the fundamental knowledge you need to springboard your rewarding career in modern web development.
Ready to go beyond the basics and learn how to use data binding, security, and deployment? Enroll in the Comprehensive MVC Master Course in Chennai and become a certified developer!