
Amazon Web Services (AWS) enables users to retrieve information from their Amazon accounts, granting them access to a comprehensive range of AWS services. Users can explore and utilize various functional AWS components during a complimentary 12-month trial period offered through their Amazon accounts. This trial allows users to access AWS services like S3, EC2, DynamoDB, and more at no cost. However, it’s important to note that there are certain restrictions and limitations when utilizing AWS And resources.
Here are the steps to set up an Amazon Web Services Account:
Step 1: Start by going to https://aws.amazon.com and click on the “sign-up” button to create a new AWS Account. Fill in all the required details. If you already have an AWS Account, simply sign in with your existing information.
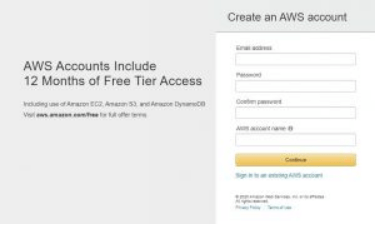
Step 2: Once you’ve entered your email address, provide your contact details. Amazon uses this information for communication, billing, and account identification. Choose between a Professional or Personal account – both have the same features and capabilities.

Step 3: Once you’ve filled in your information, make sure to thoroughly review the customer agreement, and then click the “accept” button to proceed.
Step 4: After successfully creating your AWS Account, you can log in using your email and password. Once your account is activated, you’ll have access to all AWS services.
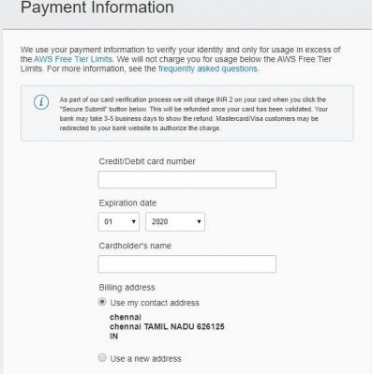
Step 5: On the Payment Information page, provide your payment details and then click the “submit” button. If needed, you can modify the address before submitting.
Step 6: Next, you’ll need to verify your phone number.
Step 7: Amazon verifies your account by sending a text message or making a voice call to the phone number you provided.
Step 8: Enter your phone number and choose your country.
Step 9: Click on the “contact me” button, and you’ll receive an automated voice message or SMS to verify your account.
Step 10: After receiving the PIN through call or SMS, input it to proceed to the following step.
Step 11: On the support plan page, users can pick any Amazon Web Service support plan. Detailed descriptions and advantages of various AWS support plans are available for users to review.
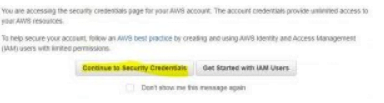
Step 12: Upon selecting a support plan, the user is directed to a confirmation page. This page provides notifications regarding account activation, which usually occurs within a few minutes. Click on the login link to access the AWS management console again.
Gain extensive AWS Training with our best AWS Online Training.
Identification Details for an Amazon Web Services Account
Identifiers for an Amazon Web Services Account
AWS employs two distinct types of IDs for each AWS Account: the AWS account ID and a canonical user ID.
AWS Account ID
The AWS Account ID, represented by a 12-digit number such as 123456789012, plays a vital role in creating Amazon Resource Names (ARNs). This identifier assists users in distinguishing resources within their AWS account, facilitating searches for specific AWS resources like a Glacier vault or IAM user resources.
Canonical User ID
A canonical user ID is a long combination of letters and numbers, like 123asdcdfg3455tyh678. It’s used in Amazon S3 bucket resource policies for allowing access from other AWS accounts. For instance, a user can let someone from another AWS Account access their bucket by specifying this unique ID in the S3 bucket policy.
AWS Account Alias
Users have the option to give their AWS Account a nickname. This means that instead of using their original AWS account name, they can use a name related to their organization or something else they prefer when signing in to the AWS console page.
Explore our comprehensive AWS Training Course Syllabus in Chennai now.
Default Sign-in URL:
The standard sign-in URL for AWS accounts is typically in the format of https://user_account_id.signin.aws.amazon.com/console/.
However, if a user sets up an alias for their account, the sign-in URL changes to https://alias_account.signin.aws.amazon.com/console/.
The default AWS Account ID URL remains active and can still be used even after an account alias is created. Users have the flexibility to create or remove account aliases using the AWS Management Console, the command line interface, or the IMP API.
How to create or delete AWS Account alias?
To access the AWS Management Console, users can sign in via https://console.aws.amazon.com/iam/.
• Navigate to the Dashboard by selecting it from the navigation panel.
• Choose the Customize button located next to the IAM user login link.
• Users have the option to input an alias name and then click “Yes, Create” to establish an alias account.
• If a user wishes to delete the alias account, they should select the customize button and confirm by clicking “Yes, Delete”.
What is Multi-Factor Authentication? And how to enable it?
Multi-Factor Authentication (MFA) enhances security by requiring users to enter a unique credential code, obtained from an authorized authentication SMS text message or device, when accessing AWS accounts or services. Access to services is permitted if MFA is enabled; otherwise, users cannot utilize the services.
It offers top-notch security for AWS account resources and settings. Users have the ability to enable MFA for both their AWS account and IAM users. MFA is utilized to control access to AWS service APIs. AWS does not impose any fees for MFA usage, whether using a virtual MFA device or supported hardware. Users can efficiently manage access across multiple AWS accounts through the use of MFA.
Here are the steps to enable an MFA device:
- Go to the link https://console.aws.amazon.com/iam/.
- Choose the user account from the list by clicking on the navigation pane.
- Scroll down to the bottom and select MFA under “View security credentials.”
- Click on “Activate MFA” and follow the provided instructions to set up and activate the MFA device.
To enable MFA, you can choose from these methods:
- SMS MFA Device
- Hardware MFA Device
- Virtual MFA Device
SMS Multi-Factor Authentication (MFA) Device:
MFA adds extra security when a user logs in. After entering their login details, AWS sends a secret 6-digit code to their phone via text message. This code is only valid for 3 minutes. To log in successfully, users need to enter this code on the website. If the phone number registered for this isn’t being used, users need to reach out to customer service. The administrator, with the right permissions, can update a user’s phone number using AWS tools like API or AWS CLI.
Hardware Multi-factor Authentication (MFA) Device:
Using a hardware MFA device elevates security for a user’s AWS root account, effectively safeguarding AWS services and resources from potential hackers. This approach adds an extra layer of protection to the original AWS root credentials, making it impossible for unauthorized individuals to access the account without the correct 6-digit MFA code.
Virtual Multi-factor Authentication (MFA) Device:
A virtual MFA device is a mobile app that emulates a physical MFA device. It generates a unique 6-digit code using a password that is time-synchronized. To verify the correct user, this passcode needs to be entered on the website’s second page during authentication.
Gain in-depth knowledge about Amazon Web Services and It’s Advantages quickly.
AWS Identity and Access Management (AWS IAM)
Inside their AWS Account, users have the ability to generate numerous user profiles and manage their access rights.
Simple steps to generate users within AWS IAM:
- Go to https://console.aws.amazon.com/iam/ and log in to the Console Management.
- Select the “User” option from the navigation pane on the left to access and view all users.
- Click the “Create New Users” button to open a new user window. Users can enter a new username and create the user by selecting the “create” option.
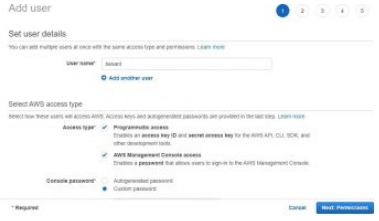
- To view Access Key IDs and secret keys, click on “Show Users Security Credentials” link. Users can also download and save this information using the “Download the Credentials” button.
- Manage user security authorizations, such as creating passwords, controlling security certificates, setting up MFA devices, and creating or deleting access keys, by accessing relevant options.
Delve into AWS Interview Questions and Answers to crack AWS interviews.
Conclusion:
In conclusion, creating an AWS account is a crucial initial step towards leveraging the huge variety of services and resources offered by Amazon Web Services. This process involves setting up a user account, configuring security measures like MFA, and managing user permissions. By following these steps and best practices, users can establish a secure and efficient AWS Account, paving the way for successful cloud computing endeavors. Stay informed, stay secure, and embrace the power of AWS for your organizational needs.
Empower your future with AWS Training in Chennai and conquer the cloud revolution now!