
RPA Automation with Automation Anywhere Control Room
Various tools have emerged in the market ever since the arrival of automation. Automation Anywhere is a prominent RPA tool used by global industries to automate a wide range of processes. This clearly emphasizes the importance to improve our RPA skills and comprehend the architecture of this technology. In this Automation Anywhere Control Room article, we will cover what is automation anywhere, its architecture, and control room components along with a step-by-step procedure of practical implementation. Learn this RPA tool comprehensively in our Automation Anywhere Training in Chennai.
What is Automation Anywhere?
Automation Anywhere is a robotic process automation (RPA) tool that attempts to give customers a digital workforce comprised of software bots. These bots are in charge of completing an end-to-end procedure while also offering scalability and security. This RPA Automation Anywhere tool has introduced a community edition that will assist you in exploring the tool and automating processes. Once you’ve mastered the tool, it also provides an Enterprise Edition with a 30-day free trial.
The Architecture of Automation Anywhere
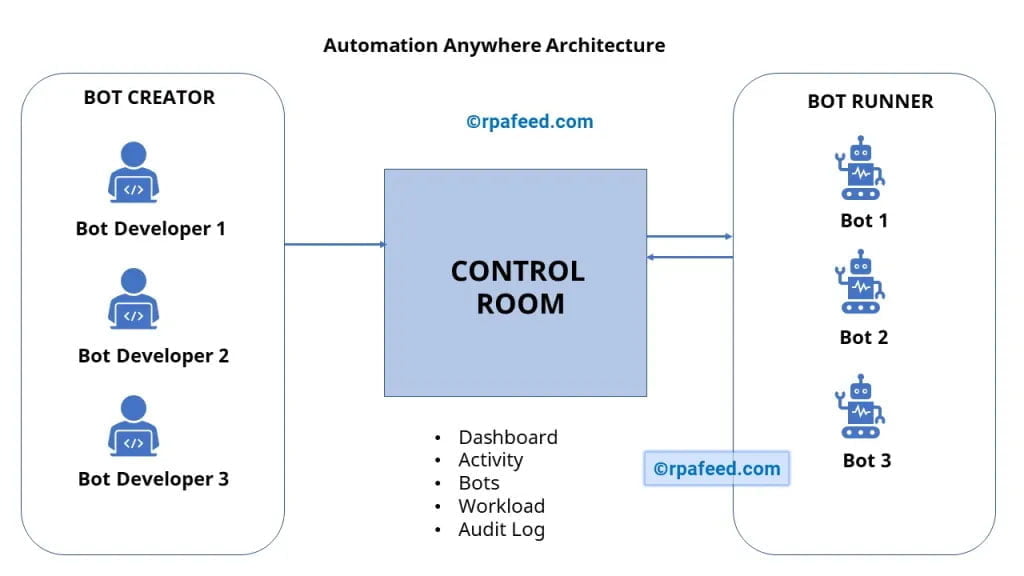
Automation Anywhere has follows distributer architecture. This architecture consists mostly of three components that work together to assist the user in completing his activities. Bot Creators, Control Room, and Bot Runners are the three groups. The Bot Creators and Bot Runners are linked to the Control Room, which serves as the brain of Automation Anywhere. Let us now explore each of these components individually.
Bot Designers
Bot Creators are simply tools for creating bots. These are desktop apps that only upload or download bots and link them to the control room. Additionally, numerous people may design and configure bots for the Control Room.
Runners of Bots
Bot Runners are in charge of running or executing the scheduled bots. Multiple bots can run concurrently, but Bot Runners cannot update or develop automation. This Automation Anywhere component is also linked to the Control Room and has the capability of reporting the execution log status to the control room.
Control Panel
The most significant component of the architecture is the Control Room. It is a web server that controls the bots developed by the Bot Creators as well as the automation carried out by the Bot Runners. The Control Room guarantees centralized administration by providing capabilities such as centralized user management, automated deployment, and source control. A summary of the Control Room may be found in the image below.
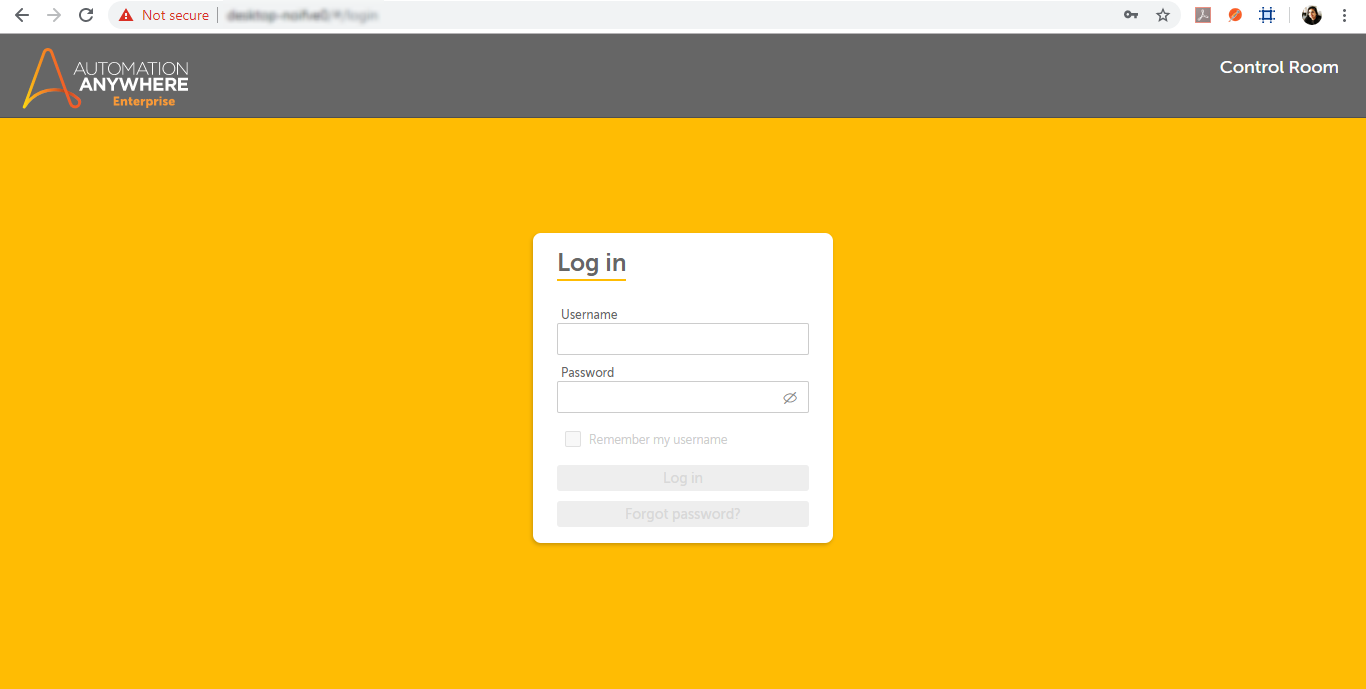
You must now log in to the Control Room using the credentials you obtained after downloading the Community Edition or the Enterprise Edition. These credentials can be found in your email inbox. Please see the screenshot below:
After logging in, you will be sent to the Control Room dashboard. Please see the screenshot below:
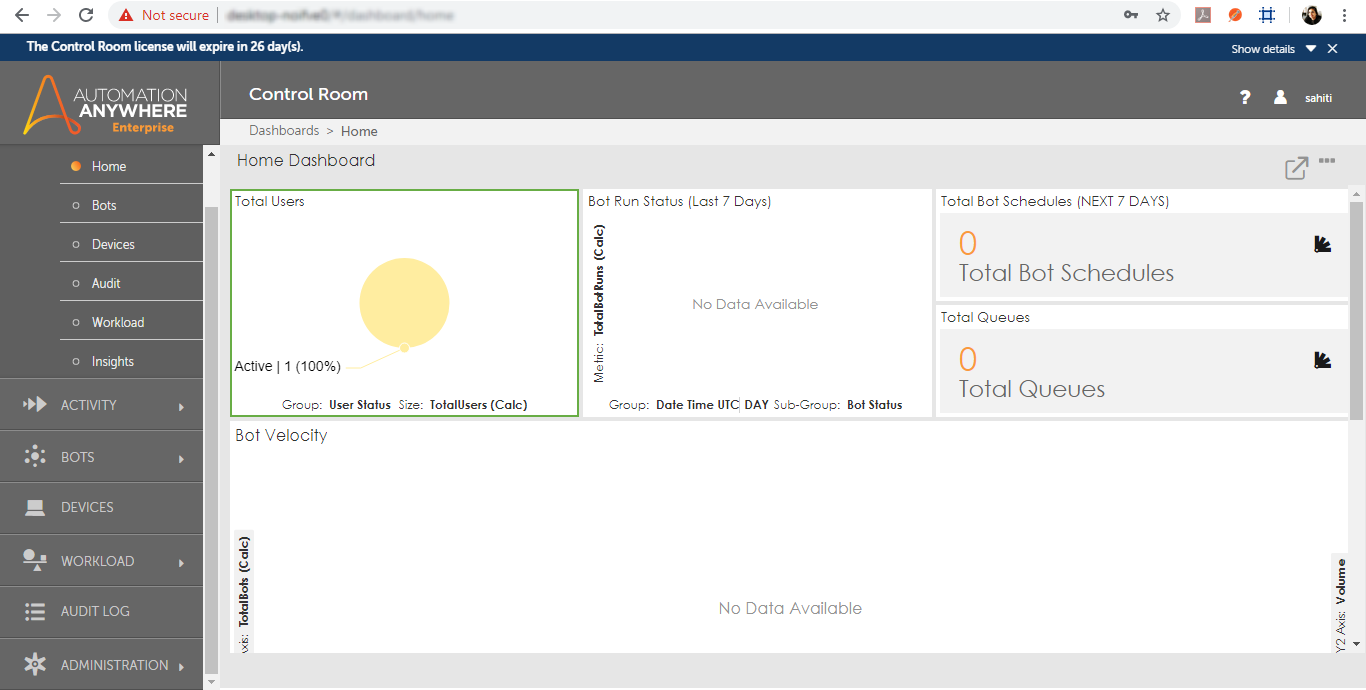
Remember : If you do not have an Enterprise Edition, you will not see the Administration option on the left-hand side of the above dashboard.
Components of Automation Anywhere
Major components of Automation Anywhere RPA Tool are as follows
Dashboards
Control Room’s Dashboard function essentially gives statistics for various parameters. It has the following five options:
Home – The Home dashboard displays the bot run status, total queues, total bot schedules, total users, bot velocity, and bot vs bot runner capacity to users.
Bots – The bots dashboard displays the bot heartbeat, MVP bots, bot status, failure causes, and the bots’ forthcoming schedule.
Devices – The dashboard for devices focuses on hardware consumption such as CPU utilization, Memory Utilization, HDD Utilization, Upcoming Device Utilization, and Failure Analysis.
Audit – The Audit tab records all activities or actions taken by different users.
Workload – The Workload Dashboard is divided into two sections: the Executive Dashboard and the Operation Manager’s Dashboard. The Executive Dashboard visualizes queue status, queue average time, device pools by backlog, and queues by time to completion. Similarly, the Operation Manager’s Dashboard visualizes device pools by FTE, pools by decreasing error rate, queues by average time, and device pools by the backlogs.
Insight – Bot Insight focuses on real-time business insights and the digital workforce.
Activity
The Control Room dashboard’s activity function is primarily used to review the history and status of planned operations. It has the following three options:
In progress : The ‘In Progress’ Activity tab is used to verify the status of the currently performing activity. It displays all activity-related information such as the username, bot name, item name, progress, and so on.
Scheduled : The Scheduled activity tab is used to view the specifics of an activity that is scheduled to run later. It displays all activity-related information such as the username, bot name, item name, progress, and so on.
Historical : The history activity tab is used to review the specifics of an activity that may have been completed, finished, paused, or timed out. It provides information such as the device name, automation name, bot name, user, began on, and so on.
Bots
To view, the specifics of tasks created, use the Control Room dashboard’s Bots function. It provides information such as the task name, credentials, customer name, and so on. It has the following three options:
My Bots : The bots page displays the jobs and their associated information, such as the name, client name, and latest changed date.
Credentials : The credentials tab displays the credentials, lockers, and credential requests.
Devices
The Devices feature indicates whether or not a user is signed into the client UI on the device. Furthermore, if the username is deactivated, the device is displayed as ‘Offline,’ and if the username is deleted, the device name is no longer displayed.
Workload
The Control Room Dashboard’s workload function reveals the queue load by providing data such as queue name, automation name, automation status, bot name, and device pool.
Audit Log
The Audit Log feature is used to keep track of all actions taken by different users.
If you have the corporate edition of Automation Anywhere, you now have access to an extra function called Administration. So, in this post, we’ll have a look at the many alternatives for this functionality.
Administration
The Control Room is configured using the Administration function. It essentially has five options:
- Settings: The settings tab contains the control room’s configuration settings, such as database setups, bot configurations, client application settings, credentials, and email notifications.
- Users: The Users tab is where you may create users with different roles.
- Roles: The roles tab displays a list of established roles as well as the option to create your own.
- Licenses: Displays a list of available product and device licenses. It also reveals which licenses have been obtained and whether or not they have been used.
- Migration: The Migration tab is used to move data from an old version of the Control Room.
Hands-On Tasks
Now let’s understand how to upload a bot to the control room in the following hands-on.
Solution: To upload a bot, the following procedures must be taken:
- Create a User
- Assign roles to the User
- Login to the Automation Anywhere Client
- Assign a license to the user.
- Select the assignment that must be uploaded.
Image Sources for the below screenshots
Creating a user
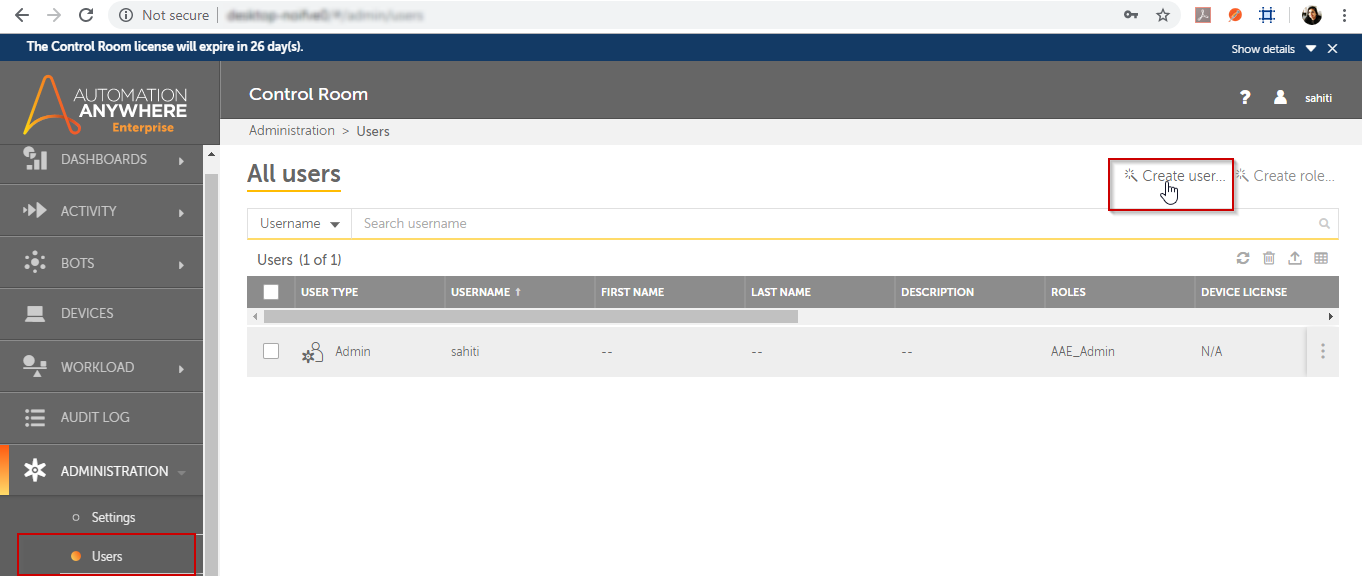
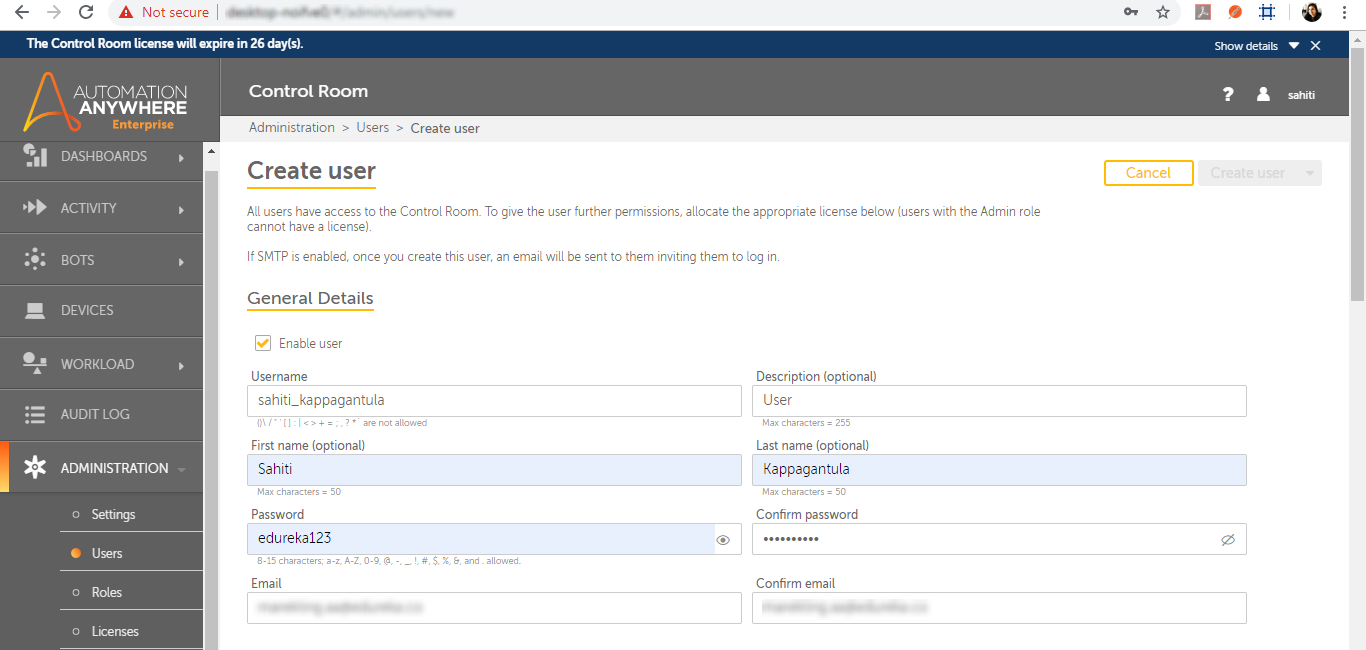
Step 1 : Log in to the control panel and navigate to Administration -> Users. Then, on the right, select the Create a user option.
Step 2 : When you select the option to create a user, you will be taken to the following screen, where you must provide general information as shown below:
Assign the user with roles
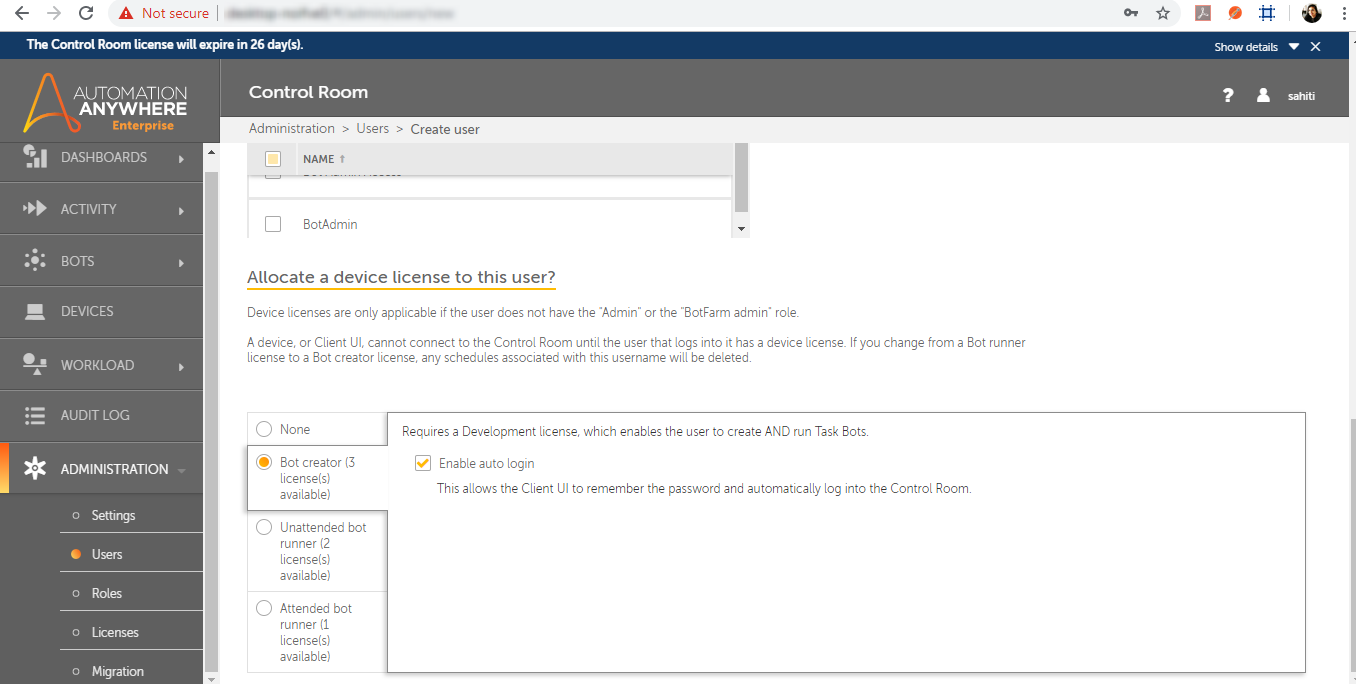
Step 1 : Following the general information, you must assign a role to the user. Scroll down the page and select the role you want to assign to the user. Then, beside the list, click the rightarrow to give the role to the user. Please see the following.

Remember: In this case, we’ll be giving the user the AAE Basic role. You can give the user more than one role.
Allocate a license to the user
Step 1 : Now, scroll down and select the license that you want to assign to the user. Please see the following.
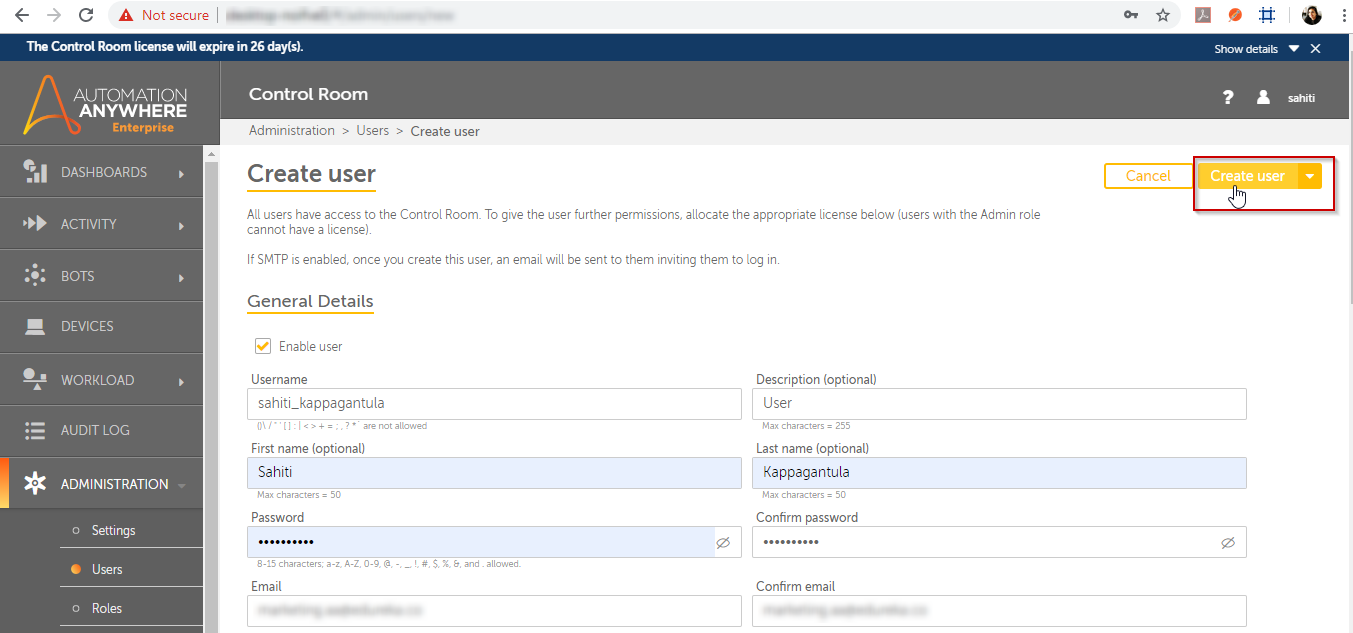
Step 2 : Finally, scroll up the page and click the Create User button, as seen below.
When you click on Create User, a user will be created immediately, and you can view the user on the Users page as seen below:

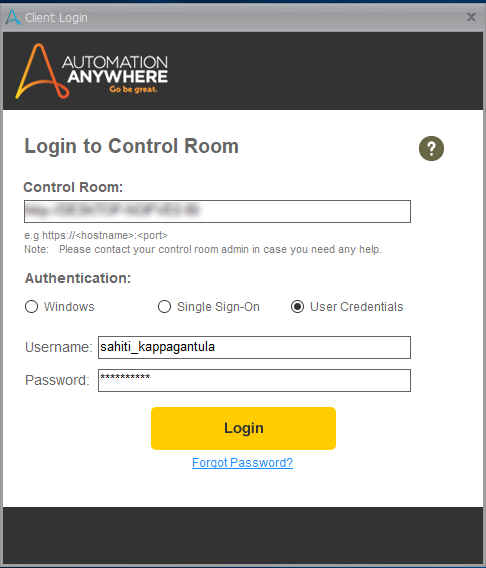
Log in to Automation Anywhere Client using your login credentials.
Once a user has been created, you must connect to the Automation Anywhere Enterprise Client using the same username and password that you used when creating the user. You may also get the Control Room URL by going to Administration -> Settings -> General.Now, launch the Client application and enter the following information:
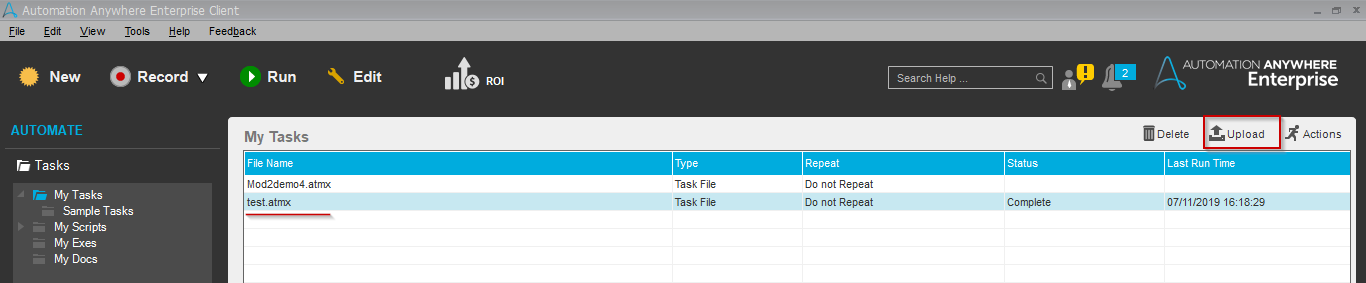
Choose the task that can be uploaded
When the Client is open, select the task you want to upload and click the Upload button on the right-hand side.
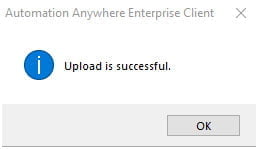
When you select the Upload option, you will get the following result.
Finally, you may check whether or not the bot has been uploaded by navigating to the My Bots area, as seen below.

Conclusion
We hope you understand what the Control Room is and what the various components of the Control Room’s dashboard are. Now, if you want to get a head start on your career as an RPA Developer, you should start understanding RPA and its many tools. Enhance your automation skills in our Automation Anywhere Training Institute in Chennai with Placement Assistance at Softlogic Systems.