JavaScript is easy to learn as a programming language and when it is learned by practicing it will become handier and more familiar for learners.
Practicing the fundamental concepts is a must for beginners and it will be helpful for them to have an in-depth understanding of basic programming.
Here in this blog, we are explaining How to Build a Calculator in JavaScript and we cover prerequisites, functions, visible sections, and CSS flavors required for building a calculator program.
Prerequisites for building a calculator in JavaScript
As a beginner, you have to be familiar with the needs of a local server like wamp or xampp to verify the codes before deployment.
It is better to start your code with IDEs or Sublime Text3, NetBeans, or Brackets. Hence, the following are important before developing a calculator program.
- Integrated Development Environment
- Local Server / Online Compiler
You can utilize the following for linking various files to your program
Embedding CSS (Cascading Stylesheet)
Inline CSS: It can be called when you want to add CSS to your required elements. Inline CSS is good for beginners but it is not SEO-friendly.
Internal CSS: It is also known as Embedded CSS as the properties and rules are set in the HTML document. It will be specified by <style></style> tags of the <head> section.
External CSS: It is a separate CSS file with the style attributes associated with the primary file in the root directory.
Here we use inline CSS and it should be figured out with the required buttons. The required elements for our calculator program are as follows
Display Screen: It is for getting user inputs and displaying output results. The real-time display screen is needed for developing a complete calculator.
Buttons: For building a basic calculator, you just need 17 buttons with the following factors
- Numbers from 0 to 9 – 10 buttons
- Operations – addition, subtraction, multiplication, and division – 4 buttons
- Others like decimal, clear, and result – 3 buttons
It is important to form a table with rows and columns and it should be the visible part that can be facilitated by CSS. Therewith, we will do into <style> section.
The JavaScript Part
The JavaScript part includes the display, solve, and clear functions.
Display Function: You have to create this function for displaying user inputs and output results on the screen and it can be called by “document.getElementById” and the id is “soft”.
Solve Function: You have to use the eval() function in JavaScript and it has a defined purpose of solving with codes of JavaScript.
Clear Function: You require this to include void in between the quotes.
<script>
//function for displaying values
function dis(val)
{
document.getElementById(“soft”).value+=val;
}
//function for evaluation
function solve()
{
let x = document.getElementById(“soft”).value;
let y = eval(x);
document.getElementById(“soft”).value = y;
}
//function for clearing the display
function clr();
{
document.getElementById(“soft”).value = “”;
}
</script>
The Visible Section
The visible section contains the title, table creation, and display parts and they are as follows
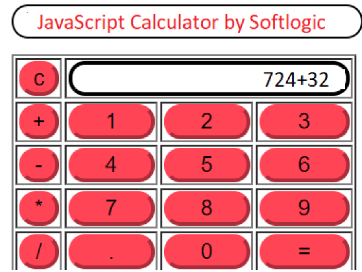
- Title is the part you have to write anything like “JavaScript Calculator by Softlogic”
- Table Creation is for rows that contain buttons and input functions.
- Display part can be used with dis() function with onclick() function.
You can use the following codes for the visible section
<!– create table –>
<body>
<div class=title >JavaScript Calculator by Softlogic</div>
<table border=”1″>
<tr>
<td><input type=”button” value=”c” onclick=”clr()”/> </td>
<td colspan=”3″><input type=”text” id=”soft”/></td>
<!– clr() function will call clr to clear all value –>
</tr>
<tr>
<!– creating buttons and assigning values–>
<td><input type=”button” value=”+” onclick=”dis(‘+’)”/> </td>
<td><input type=”button” value=”1″ onclick=”dis(‘1’)”/> </td>
<td><input type=”button” value=”2″ onclick=”dis(‘2’)”/> </td>
<td><input type=”button” value=”3″ onclick=”dis(‘3’)”/> </td>
</tr>
<tr>
<td><input type=”button” value=”-” onclick=”dis(‘-‘)”/> </td>
<td><input type=”button” value=”4″ onclick=”dis(‘4’)”/> </td>
<td><input type=”button” value=”5″ onclick=”dis(‘5’)”/> </td>
<td><input type=”button” value=”6″ onclick=”dis(‘6’)”/> </td>
</tr>
<tr>
<td><input type=”button” value=”*” onclick=”dis(‘*’)”/> </td>
<td><input type=”button” value=”7″ onclick=”dis(‘7’)”/> </td>
<td><input type=”button” value=”8″ onclick=”dis(‘8’)”/> </td>
<td><input type=”button” value=”9″ onclick=”dis(‘9’)”/> </td>
</tr>
<tr>
<td><input type=”button” value=”/” onclick=”dis(‘/’)”/> </td>
<td><input type=”button” value=”.” onclick=”dis(‘.’)”/> </td>
<td><input type=”button” value=”0″ onclick=”dis(‘0’)”/> </td>
<!– Evaluating function call eval()–>
<td><input type=”button” value=”=” onclick=”solve()”/> </td>
</tr>
</table>
</body>
CSS Flavors
Here, you should provide title as optional, the border radius with 10x for round corners to the elements, width for 100% to cover the entire screen, and the RGB color code with #ff4456. Now the codes are as follows
<!– for styling –>
<style>
.title{
border-radius: 10px;
margin-bottom: 10px;
text-align:center;
width: 210px;
color:#ff4456;
border: solid black 1px;
}
input[type=”button”]
{
border-radius: 10px;
background-color:#ff4456;
color: black;
border-color:#ff4456 ;
width:100%;
}
input[type=”text”]
{
border-radius: 10px;
text-align: right;
background-color:white;
border-color: black ;
width:100%
}
</style>
Output Screen
Conclusion
Interesting? Join Softlogic to enjoy the best JavaScript Training in Chennai with a handful of hands-on exposure to fundamental to advanced level programming.
Our trainers have designed the curriculum meticulously to provide the Best-in-class coaching for learners around the world.